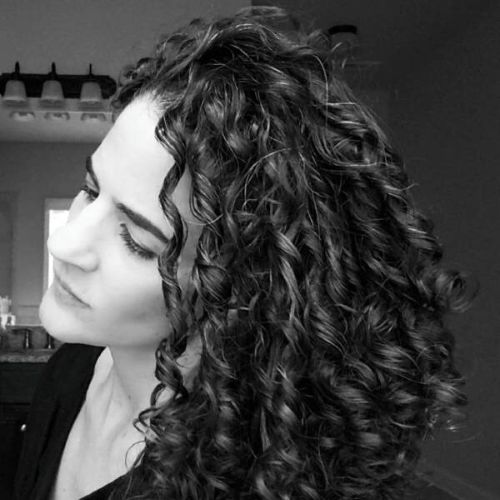

The first time I plopped my hair, I did it half expecting nothing to happen. I have 3c curls, they are thick, and most curly hair techniques that go viral turn out to have been designed for someone with looser waves than mine.
It worked. My curls came out more defined, and the change I did not expect was in the frizzier sections. Those areas became pliable while they were wrapped up, and my products were finally able to soften them instead of sitting on top of them. That softening is what turned frizz into definition.
What I want to give you here is not another eight-step tutorial. Those are everywhere and they all say roughly the same thing. What is missing from every one of them is an explanation of why plopping works, and that explanation is what lets you fix it when it does not.
| The short answer: Plopping is not a drying technique. It is a setting technique. Hair holds whatever shape it was in at the moment the water left it, so plopping works by holding your curls compressed and coiled through the window where they set. Wrap freshly styled, soaking wet hair in a cotton T-shirt or microfiber towel, leave it 10 to 45 minutes depending on your density, then release and let it finish drying undisturbed. |
What Is Plopping, and What Is It Actually Doing?
Plopping means piling your wet, freshly styled hair on top of your head and wrapping it in a soft fabric, usually a cotton T-shirt or a microfiber towel, so it can dry in a compressed, accordioned position instead of hanging down under its own water weight.
Every guide you will read stops there and tells you it reduces friction. Friction reduction is real and it is a genuine benefit, but it is not the mechanism. If it were, simply not touching your hair would give you the same result, and it does not.
The part nobody explains: your hair sets as it dries
Inside a hair strand, alongside the permanent disulfide bonds that give your curl pattern its underlying shape, there is a second set of much weaker bonds called hydrogen bonds. These are temporary. Water breaks them, which is why wet hair stretches, hangs longer, and can be pushed into almost any shape. As the water evaporates, those bonds re-form.
Here is the part that matters: they re-form around whatever shape your hair is in at that moment. That is the entire basis of a roller set, a twist-out, a braid-out, a wrap, and a blowout. It is also the basis of plopping. Whatever configuration your curls are holding while the water leaves is the configuration they will keep until the next time you wet them.
So plopping is a set. You are holding the curl in its most compact, springiest position through the window where it locks in. Once you understand that, the rest of this article is not a list of tips, it is a list of consequences.
- Timing matters because the set happens during a window, not instantly.
- Touching your hair mid-dry breaks the set and produces frizz, because you are disturbing bonds that are in the middle of re-forming.
- Plopping hair that is already half dry does almost nothing, because most of the setting has already happened.
- Roots go flat when they are held flat against your scalp during that window. They are setting too.
- Your products matter, because a film-forming styler holds the set in place after the water is gone.
One honest correction about drying speed
Plopping is usually described as a way to dry faster. It is more accurate to say it removes surface water quickly. Total drying time can actually be longer, because a wrapped, insulated head of hair is not exposed to moving air. If speed is your only goal, a microfiber scrunch followed by a diffuser will beat plopping. Plopping is for shape.
Why Plopping Works So Well on Curly and Wavy Hair
Four things happen at once inside that wrap.
- Gravity is removed from the equation. Wet hair can hold a large amount of water, and that weight pulls a curl pattern straight down and stretches it out. Piling hair on top of the head takes the load off, so the curl sets at its natural spring rather than at its stretched length.
- Clumps are held together. Curls that dry as a group hold a defined shape. Curls that dry as separated individual strands read as frizz. The wrap keeps clumps in contact while they set.
- Friction goes to almost zero. Nothing is rubbing across the cuticle while your hair is at its most fragile. Wet hair is genuinely weaker than dry hair, so this is a breakage benefit as well as a frizz one.
- Product gets time to work. This is the part I noticed most on my own hair. Sections that would normally frizz stayed soft and pliable inside the wrap, long enough for my stylers to actually distribute through them instead of drying on the surface. That is where the definition came from.
What to Use for Plopping (and Why Your Bath Towel Ruins It)
The material is not a preference, it is a mechanism. Curly hair frizzes on contact with the wrong surface.
| Material | How it behaves | Best for |
| Cotton T-shirt | Flat, smooth jersey knit with nothing for hair to catch on. Absorbs moderately, so it will not over-dry your hair. Long sleeves give you something to tie | Almost everyone. The default, and the cheapest |
| Microfiber towel or turban | Very absorbent and very smooth. Faster than a T-shirt, and the shaped turbans are easier to secure one-handed | Dense or long hair that holds a lot of water |
| T-shirt towel | A hybrid, jersey surface with a bit more absorbency | People who find plain T-shirts too slow |
| Net or mesh plopping cap | Holds the curl in place while letting air circulate through it | Anyone whose hair takes forever to dry, or who gets a damp scalp |
| Terry cloth bath towel | Avoid. The looped pile weave physically catches individual strands and lifts them out of their clumps, and it absorbs so aggressively that it pulls hair past damp into rough | Nothing, in this context |
The T-shirt method, specifically
If you take one thing from this page, take this: a plain cotton T-shirt you already own outperforms most things you could buy. The jersey knit is smooth and continuous, so there are no loops for a strand to snag on, and its moderate absorbency is a feature rather than a limitation. It leaves your hair damp instead of stripping it to rough, which matters because hair that dries too fast at the surface sets before the clump has settled.
Use a long-sleeved shirt if you have one. The sleeves are the tie, so you get a secure wrap without a clip, a knot at the wrong angle, or a turban that slides off. A worn-in shirt is better than a new one; the softer and thinner the jersey, the less drag.

How to Plop Curly and Wavy Hair, Step by Step
Step 1. Start with soaking wet, freshly styled hair.
Not damp. Soaking. The set happens as water leaves, so if most of the water is already gone, most of the set has already happened and there is nothing left for the plop to do. Style in the shower or immediately after, while your hair is still dripping.
Step 2. Apply and distribute your products first.
Leave-in, then cream, then gel or mousse, or whatever your working order is. Distribute thoroughly and scrunch, because a plop holds whatever you gave it and cannot fix uneven product placement. If you are still building a routine, my curly hair routine guide covers the order of operations.
The exception: if your hair is fine or low density and plopping has left it limp before, plop first for a few minutes to shed water weight, then apply product to hair that is damp rather than saturated.
Step 3. Lay your fabric flat on a bed, chair, or counter.
Flat and fully spread. If you are using a T-shirt (this works well too), put the neckline nearest to you so the sleeves end up positioned to tie.
Step 4. Bend forward and lower your hair ends first.
Ends touch the fabric first, then keep lowering your head so the lengths fold and concertina in on themselves in the center. This folding is the whole point. Do not drop straight down onto your crown, because that flattens the curls instead of stacking them.
Step 5. Fold the fabric up over the nape of your neck.
Bring the far edge of the shirt up over the back of your head, then stand up. Your hair should now be sitting in a pouch on top of your head.
Step 6. Twist the sides into ropes and tie at the back.
Twist each side, bring them around your head, and tie at the nape over the flap you just folded up. Snug enough to stay on, loose enough that it is not compressing your hair against your skull. Tight is not better here.
Step 7. Leave it, then release carefully.
Untie rather than yanking, and let your hair fall out on its own rather than pulling it out. Then leave it alone to finish drying, or diffuse on low. The urge to touch it is enormous. Every touch during this window costs you definition.
How Long Should You Plop?
This is where most guides give one number, and one number cannot be right for both fine 2b waves and dense 4a coils. Density is the variable that matters more than curl pattern, because density determines how much water is in there.
| Your hair | Start with | Why |
| Fine or low density | 5 to 15 minutes | Sets fast and compresses easily. Longer risks flat, limp results |
| Medium density | 15 to 30 minutes | The comfortable middle. Most people land here |
| Thick, dense, or long | 30 to 45 minutes | Holds far more water, so the set window is longer |
| Very dense or coily | 45 minutes and up, or a net cap | Air circulation becomes the limiting factor, not time |
Treat those as starting points and adjust once. If you release and your hair is still soaking, plop longer next time. If it comes out flat or feels mushy and overworked, plop for less. Two wash days of adjustment will get you closer than any chart.
Micro-Plopping: What to Do If Plopping Does Not Work for You
Micro-plopping is the variation that almost never makes it into the popular guides, and it is the fix for the majority of people who tried plopping once, hated the result, and gave up.
Instead of wrapping and tying, you drape a T-shirt or microfiber towel over your open palms, cup a section of wet hair, and gently squeeze upward toward your scalp. Then move to the next section, and repeat all over your head until your hair is no longer dripping. That is the whole technique. No tying, no bending over, and it takes about two minutes.
What it does differently: it removes the water without ever holding your hair compressed against your head. So you get the frizz reduction and the water removal, and you keep root volume, because nothing was ever pressed flat during the set.
Use micro-plopping instead of plopping if you have fine hair, loose waves, low density, or if full plopping has given you flat roots. Use both together if you want: plop for 5 to 10 minutes to set the clumps, then release and micro-plop to take out the remaining water before you diffuse.
The Other Plopping Variations Worth Knowing
Wet plopping
A plastic shower cap over freshly styled hair, or over a deep conditioner, for 10 to 20 minutes. This one is not for drying at all, it is the opposite. It traps warmth and humidity to help product distribute and to give a deep conditioner better contact.
One caution that gets left out: do not extend this into an hours-long soak because it feels productive. Hair that stays saturated and swollen for very long periods is not being repaired, it is being stressed. See hygral fatigue for what that actually does.
Net plopping
Same idea as a standard plop, but using a mesh or net cap so air can circulate through the curls while they are held in position. This solves the biggest weakness of plopping for dense hair, which is that a wrapped head simply does not dry. If your hair takes hours and you keep releasing a plop into hair that is still soaking, this is the version to try.
Refresh plopping on day two or three
Plopping is not only a wash-day technique. If your curls have gone limp or lost their shape a few days in, mist the affected sections until they are properly wet again, re-apply a small amount of leave-in or cream, and plop for 10 to 15 minutes. You are re-setting the hydrogen bonds, which is the only thing that will genuinely reshape a curl that has fallen. This is a much better answer than adding more product to dry hair.
Overnight plopping, and why I would think carefully about it
It is a popular question and the honest answer has two halves.
The styling half: it works for some people and backfires for others. If your hair is dense and takes a long time to dry, an overnight plop can genuinely be practical. If your hair is fine, you will very likely wake up flat, because eight hours is far longer than the set window and your hair spent all of it compressed.
The half nobody mentions: a scalp kept damp and covered for eight hours, warm and without airflow, is a scalp being given ideal conditions for yeast overgrowth. That is the real cause of a musty smell in hair, and it can also feed itch, flaking, and irritation. I have written about this properly in mold, mildew, and what actually causes that smell in hair, and it is a bigger deal than the definition you might gain. If you want the practicality of overnight, use a net cap so air moves, or dry your roots first and plop only the lengths.
Plopping vs. Pineappling vs. Diffusing
These three get used interchangeably online and they do completely different jobs.
| Technique | When | What it is for |
| Plopping | Wash day, on soaking wet styled hair | Setting the curl shape as it dries |
| Micro-plopping | Wash day, on soaking wet styled hair | Removing water without compressing the roots |
| Diffusing | After plopping, or instead of it | Speeding up drying with airflow while supporting the curl |
| Pineappling | At night, on fully dry hair | Preserving a set that has already happened |
The most common mistake is pineappling damp hair. If your hair is still wet, you are not preserving a set, you are creating a new one, and it will set in a stretched, gathered shape at the crown.
Plopping Troubleshooting: Why It Is Not Working
| What happened | Why | What to change |
| Roots are flat | Roots set flat against your scalp while compressed. Most common on fine, low density, and wavy hair | Micro-plop instead, cut the time in half, or root clip after releasing |
| Hair is frizzy anyway | Either it was disturbed mid-dry, or it was not wet enough when you plopped | Do not touch it after release. Plop soaking wet, not damp |
| Still soaking after 45 minutes | No airflow, high density | Net cap, or release and diffuse the rest of the way |
| Curls feel gummy, mushy, or overly soft | Hair was saturated and wrapped too long | Shorten the plop, and see the hygral fatigue guide |
| Product seems to have vanished | A plop absorbs product as well as water, especially with a very absorbent towel | Glaze a small extra layer over your curls after releasing, or switch to a T-shirt |
| Curls are crunchy and stuck together | Not a plopping problem. That is your gel cast | Scrunch the cast out once hair is 100 percent dry |
| Nothing changed at all | Hair was already too dry when you plopped, so it had already set | Plop straight out of the shower while dripping |
| Definition looks worse than air drying | Some patterns genuinely do not respond | Try micro-plopping, then try diffusing. Plopping is not compulsory |
Does Plopping Work on All Hair Types?
Mostly yes, but what it does for you changes a lot depending on your texture, and the standard advice on this is written from a wavy hair point of view without saying so.
Wavy hair, 2a to 2c
Plopping usually makes a dramatic difference to definition, and it is also where flat roots are most likely. Both of those come from the same source. A wave is a gentle bend that generally does not begin until partway down the strand, so the hair at the scalp is relatively straight and lies flat, and it does not take much water weight to pull the whole thing loose. That is why wavy routines are full of root clipping, root lifting, and diffusing upside down. Plop, but plop briefly, or micro-plop.
Curly hair, 3a to 3c
This is the sweet spot, and it is my range. My curls came out more defined, and I have never once had a flat root problem from plopping, which surprises a lot of people given how much of the internet warns about it.
There is a logical reason for that, and it is worth spelling out because nobody does. My hair is curly from the root down, not from the mid-length down. The curl starts at the scalp, so the strand is already lifting itself away from my head before anything is done to it, and volume is built into the geometry rather than something I have to manufacture. My hair is also thick and dense, and a dense head of hair physically resists being compressed flat. Wavy hair has neither of those advantages at the root, which is why wavy folks have to work so hard for lift there and I do not.
If your hair curls at the root and you have decent density, you can plop with a lot more confidence than the general advice suggests.
Coily hair, 4a to 4c
The usual advice is to skip it. I think that is too blunt, and it leaves out the people most likely to be reading a curly hair site.
The root volume warning does not apply to you at all, for the same geometry reason as above, only more so. What does apply is drying time. Coily hair holds a lot of water and dries slowly, and a tightly wrapped head with no airflow can leave your hair and scalp damp for hours, which is a scalp health issue before it is a styling one. Tight coils also tangle against themselves, so a long plop can mean more knots on the way out.
- Use a net or mesh cap rather than a wrapped towel, so air moves through.
- Keep it short, 20 to 30 minutes, then release and let air get to your roots.
- Micro-plopping is often the better trade for coily hair. Water removal with none of the drying time or tangling cost.
- If you are wearing a twist-out, braid-out, or wash-and-go with a defined set already, plopping is redundant. Your set technique is already doing the setting job.
More on care for tighter textures in my 4b hair guide.
Fine hair, any pattern
Density matters more than curl pattern here. Fine, low density hair compresses easily and sets fast, so it is the most likely to come out flat. Start at five minutes, or skip straight to micro-plopping. See fine curly hair with an oily scalp and dry ends for more on how fine hair behaves differently.
Frequently Asked Questions
Do you plop before or after applying product?
After, in almost every case. Your styler needs to be evenly distributed before your hair sets, and a plop cannot fix uneven application. The exception is fine or low density hair, where plopping briefly first to shed water weight and then applying product to damp hair often gives a better result.
Can you plop overnight?
You can, but weigh it up. Fine hair will usually come out flat, because eight hours is far longer than the setting window. More importantly, a damp scalp kept warm and covered all night is a good environment for yeast overgrowth, which is the real source of musty-smelling hair, itch, and flaking. If you want the convenience, use a mesh cap so air circulates.
How wet should my hair be when I plop?
Soaking. If your hair is already damp, most of the set has happened and plopping will not do much. Style in the shower or right out of it, while your hair is still dripping.
Why does plopping make my roots flat?
Because your roots set flat against your scalp while they were compressed. It is most common in fine, low density, and wavy hair, where the strand is fairly straight at the scalp to begin with. Micro-plop instead, or halve your plopping time.
Does plopping actually make hair dry faster?
It removes surface water quickly, but a wrapped, insulated head has no airflow, so total drying time can be longer. Plop for shape. If you want speed, plop briefly and finish with a diffuser.
Can you plop straight hair?
You can, and it will add some body and a soft bend, but the effect is mild and short-lived. Straight hair has no curl pattern to set into, so you are working with the hydrogen bonds alone.
What if I do not own a microfiber towel?
Use a T-shirt. It is not a downgrade. The smooth jersey knit is excellent for this, and its moderate absorbency means it will not pull your hair past damp into rough the way a very absorbent towel can.
Should I plop every wash day?
Only if it improves your result. Plopping is a tool, not a rule. Plenty of people get better definition from diffusing, and plenty get their best result from micro-plopping. Change one thing at a time and give it a couple of wash days before you judge it.
Can I plop with a regular bath towel?
I would not. Terry cloth has a looped pile weave that physically catches individual strands and pulls them out of their clumps, which is frizz by definition, and it absorbs aggressively enough to take your hair past damp.
My hair feels mushy after plopping. What went wrong?
Your hair was saturated and stayed wrapped too long. Hair that is water-swollen for extended periods gets soft and weak rather than conditioned. Shorten the plop and read up on hygral fatigue.
The Bottom Line
Plopping is a set, not a dry. Your hair holds whatever shape it was in when the water left, and plopping simply holds your curls in their most compact position through that window. Once that clicks, everything else becomes adjustable: how wet, how long, how much compression, how much airflow.
For me, on thick 3c curls, it delivered more definition and softened the sections that usually frizz, with none of the flat root problem the internet had prepared me for. Your result will depend on your density and where on the strand your curl begins. If a full plop does not suit you, micro-plopping almost certainly will.
Change one thing, give it two wash days, and let your own hair tell you.